Viper MKVII
I'm going to be building the Moebius Viper MKVII from BattleStar Glactica for an upcoming model show.
A Brief Review
This is the latest BattleStar Galactica kit from Moebius Models and it offers a good base for building a nice viper. However, in order to do so many corrections and additions will need to be done to this kit. For $30 retail I suppose you have to expect that.
The biggest area of concern needed to be addressed is the cockpit. This part of the kit get's an F for detail, F for accuracy, and F for effort. Should you be reading along and wish to help your chances in a decent build pick up the photo etch replacement Cockpit from Paragrafix. This kit will totaly replace the entire cockpit except the pilot and seat. It also allows for the cockpit and engines to be lit.
The rest of the kit is broken down into 3-4 sections that make up the fudelage and the engines. The upper fudelage really also will need some work. In the photo below you will see several areas I have indicated that need help. Overal the shape is there but if you want a good representation get out your scribe tool and dremel.
A particular pain point on the upper wing is a shape added to the inlet that does not belong at all on the model. Also some panel lines are incomplete or missing entirely(Can we get some Quality Control Please Moebius). If I had to rate the fuselage Detail C+, Accuracy C+, Effort B. Over all i'd rate this kit a C. So many mistakes in accuracy and detail.

Day 1
I've started on the cockpit and also correction some of the wing details. As you can see below the odd shape added to the wing inlets has been removed. Since the CGI mesh makes it look like there is a recess i've added strip styrene to mimic that and also hide the tool marks.
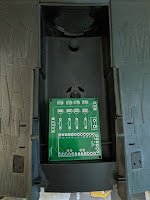
I've also started dry fitting parts of the photo etch cockpit. In addition I am planning on not using the kit provided seat(can you really call it that). I've purchased two modern fighter jet ejection seats from the A-10 and F-14(I think) to replace the "Seat". I did make one small adjustment as the recline of the F-14 seat was a bit to much to fit in the cockpit, so I made a small relief cut in the resin and used hot water so that I could adjust the seat back forward. More to come soon.

A Brief Review
This is the latest BattleStar Galactica kit from Moebius Models and it offers a good base for building a nice viper. However, in order to do so many corrections and additions will need to be done to this kit. For $30 retail I suppose you have to expect that.
The biggest area of concern needed to be addressed is the cockpit. This part of the kit get's an F for detail, F for accuracy, and F for effort. Should you be reading along and wish to help your chances in a decent build pick up the photo etch replacement Cockpit from Paragrafix. This kit will totaly replace the entire cockpit except the pilot and seat. It also allows for the cockpit and engines to be lit.
The rest of the kit is broken down into 3-4 sections that make up the fudelage and the engines. The upper fudelage really also will need some work. In the photo below you will see several areas I have indicated that need help. Overal the shape is there but if you want a good representation get out your scribe tool and dremel.
A particular pain point on the upper wing is a shape added to the inlet that does not belong at all on the model. Also some panel lines are incomplete or missing entirely(Can we get some Quality Control Please Moebius). If I had to rate the fuselage Detail C+, Accuracy C+, Effort B. Over all i'd rate this kit a C. So many mistakes in accuracy and detail.

Day 1
I've started on the cockpit and also correction some of the wing details. As you can see below the odd shape added to the wing inlets has been removed. Since the CGI mesh makes it look like there is a recess i've added strip styrene to mimic that and also hide the tool marks.
I've also started dry fitting parts of the photo etch cockpit. In addition I am planning on not using the kit provided seat(can you really call it that). I've purchased two modern fighter jet ejection seats from the A-10 and F-14(I think) to replace the "Seat". I did make one small adjustment as the recline of the F-14 seat was a bit to much to fit in the cockpit, so I made a small relief cut in the resin and used hot water so that I could adjust the seat back forward. More to come soon.


Comments